To make your life and the life of your advertisers a lot easier, you may want to get rid of manual payment processing. Luckily, the Adserver.Online platform is flexible enough to support integration with different payment systems and allows you to automate the process of receiving payments from your advertisers.
The whole integration is rather simple. All you need to do is get proper credentials/keys from your payment gateway account and paste them into the corresponding fields on your Adserver.Online panel. So this article will explain what steps you need to take to get the proper credentials. All you need to do next is just go to your Adserver.Online panel -> Settings -> Payment gateways and follow the instructions.
Payment systems integration – advanced options
Apart from the integration itself, our platform allows you to use the following settings:
- Exchange rate – can be used with payment gateways (usually local) that don't support your account currency and follows the rule: GATEWAY CURRENCY AMOUNT = ACCOUNT CURRENCY * EXCHANGE RATE.
For example, IDRAM supports DRAM only, and when you have USD as your account currency, you may want IDRAM payments to be credited in USD automatically. In this case, your user will enter an amount in USD when making a payment and will pay you in DRAM according to this formula: USD * exchange rate
- Processing fee – with this option, you can set a % that will be deducted from all incoming payments as a processing fee. Your advertisers will be credited according to the following formula: total sum – processing fee (e.g., with a 5% processing fee, an advertiser will be credited $95 after completing a $100 payment)
- Notice – a piece of text that your advertisers will see while making a payment. You can use it to notify them of your processing fee, exchange rate, or any other payment information you find relevant
- User access – you can enable or disable specific payment gateways for your advertisers with this option
Supported payment systems
Offline payment systems
PayPal integration
If you'd like to integrate PayPal into your panel, you first need a verified account with PayPal. The rest shouldn't cause any problems if you follow these simple steps:
1. Log in to your PayPal developer account at https://developer.paypal.com/
2. Create a new "Live" REST API App. The app name can be arbitrary.
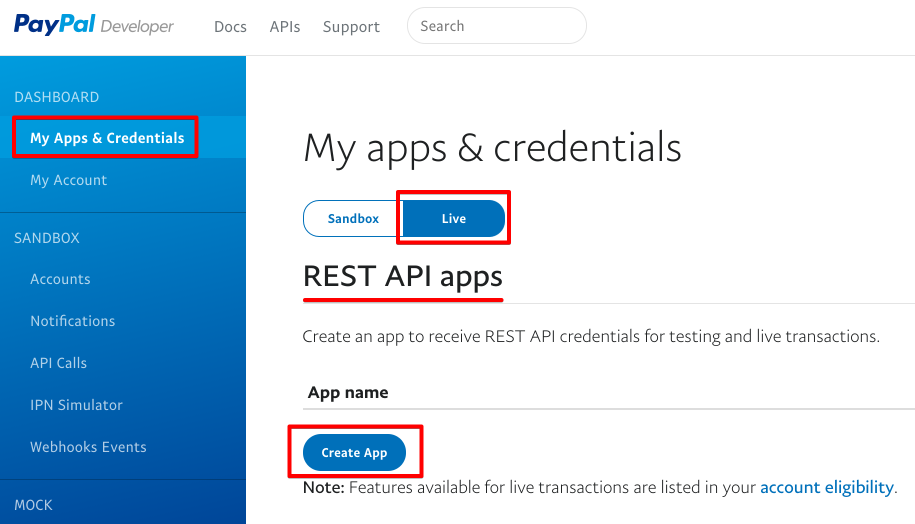
3. Get Client ID and Secret values.
Stripe integration
To ensure Stripe integration, you should get public and private keys according to this manual: https://stripe.com/docs/keys
Please note these keys should have prefixes "sk_live" and "pk_live"
Square integration
To ensure Square integration, you should get an Access Token and a Location ID. You will find the values on the developer panel at https://developer.squareup.com
Flutterwave integration
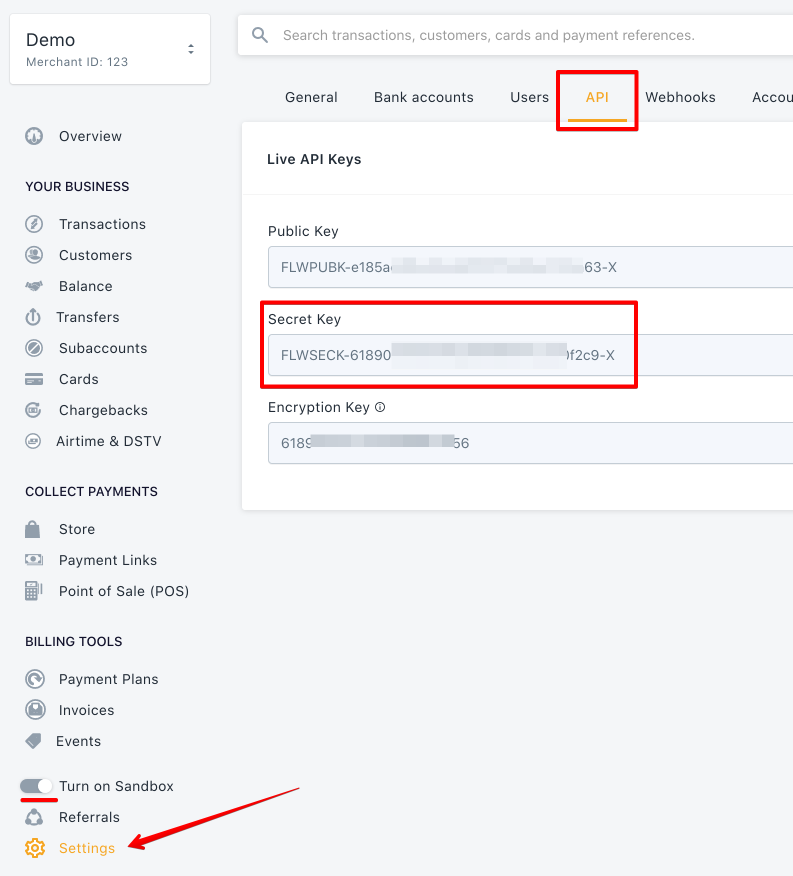
First, you should create an account here https://flutterwave.com. After that, you'll be able to get the API keys needed for integration.
Paxum integration
A business Paxum account is required to complete an integration. You will need an email associated with your account and IPN shared secret to set everything up.
You can get IPN shared secret in Merchant Services / IPN Settings menu.
WebMoney integration
First, you should have a formal or higher level WM-passport with a verified scan or photo of the ID or Megastock registration.
To set everything up, you will need your WM purse number (e.g. Z337711340345) and a secret key.
You need to generate the secret key by yourself. Be aware you should not use any of your existing passwords or keys. We would recommend using a service like this https://www.lastpass.com/password-generator to generate a new random key.
How to configure
Go to your merchant panel at: https://merchant.wmtransfer.com/conf/purses.asp
Click "Change" on the list of the purses

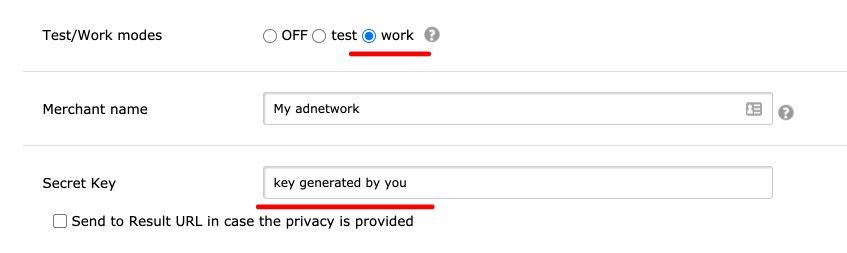
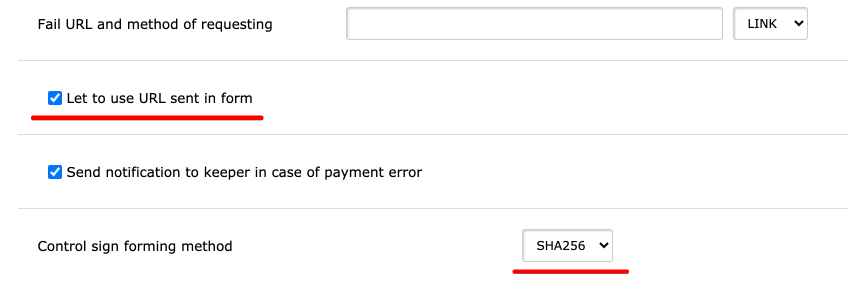
You should adjust a few settings and leave the rest at their default values.
CoinGate integration
An Access Token is the only thing you need to do to integrate CoinGate into your panel. Please follow these instructions and then send us the token: https://support.coingate.com/hc/en-us/articles/4402498918546-How-can-I-create-CoinGate-API-credentials-
MyPos integration
MyPos integration should go smoothly if you follow this documentation: https://developers.mypos.eu/en/doc/online_payments/v1_4/5-store-management
Firstly, you need to create a new shop. After that, you should get the following values:
- Wallet number. Values example: 40125162045
- Store ID. Value example: 161321
- Private key. Value example:
—–BEGIN RSA PRIVATE KEY—–
cNMzAwMjAzMTQxNTMyWjAdMQswCQYDVQQGEwJCR\MIIC
3FckXKZ3QJ699IBsA==
—–BEGIN RSA PRIVATE KEY—– - Public certificate. Value example:
—–BEGIN CERTIFICATE—–
NBgkqhkiG9w0BAQsFADAdMQswCQYDVQQGEwJCRzEOMAwGA1
slfLIYxl3FckXKZ3QJ699IfLIYxl3FckXKZ3QJ69BsA==
—–END CERTIFICATE—–
Capitalist integration
The first thing you need to do to integrate Capitalist is to create a new shop here https://capitalist.net/merchants. Few callback URLs have to be configured during the process. You will find the URL after you create a new payment gateway in our panel.
You will need 2 values to set up an integration:
- Shop ID
- Secret key
Idram integration
To complete the integration, you should use an account ID and a secret key that you will find in your Idram panel.
Vendo integration
The first thing you need is an approved account with Vendo. Then you'll be able to set up an integration using the following values:
- Merchant ID
- Site ID
- API secret token
Success URL has to be configured during the process. You will find the URL after you create a new payment gateway in our panel.
MercadoPago
The first thing you need is an approved account with MercadoPago. Then you'll be able to set up an integration using the following values:
- Access Token
How to get the needed token https://www.mercadopago.com.br/developers/en/docs/checkout-pro/requirements
Payoneer
Payoneer is not a payment gateway itself, and it doesn't support automatic payment processing like, for example, Paypal does. That's why the only way of integration is using a special "Offline transfer" payment gateway.
How to configure:
- Create a new "Offline transfer" in Settings / Payment gateways.
- Set name "Payoneer" or anything else.
- In Advanced options, in the Notice field, put this HTML-code:
<p>
Please make a <a href="https://myaccount.payoneer.com/MainPage/Widget.aspx?w=MakeAPayment#/pay/makeapayment" target="_blank">payment</a>.
</p>

<p>Recipient Payoneer account: your Payoneer email</p>
As soon as you receive a notification from Payoneer about an incoming payment, you need to go to Finance / Payments menu and create a payment manually.
Wire / Bank transfers
You need to use a special "Offline transfer" payment gateway for this kind of transfer.
How to configure:
- Create a new "Offline transfer" in Settings / Payment gateways.
- Set name "Bank" or anything else.
- In Advanced options, you need to put your bank account details in the Notice field. Note you should use HTML-codes to format the details properly. For example:
<p>
IBAN: xxxxx <br>
Recipient: My Company <br>
</p>
As soon as you received a notification from your bank about an incoming payment, you need to go to Finance / Payments menu and create a payment manually.
Payment systems integration – conclusion.
Typically, the integration process doesn't take long. If you follow these instructions and use the proper keys/credentials, you will add the payment system you want in no time.
If you can't find an option you need in this article, please let us know.